A Connecticut equipment tech is still stunned that a hack she shared on TikTok somehow ended up in the script for a popular Hallmarkmovie .
The only problem? It turned out to be a ruse that later turned out to be wrong. Oops.
TikTok user Renae ( @renduh ) shared the news on the platform on January 17 after a close friend pointed out to her that she was "famous". Apparently a viralhack recently hit Vedette Autumn Reeser, Paolo Bernardini and Lacey Chabert in The Wedding Veil: Inspiration , a nouvelle comedie romantique Hallmark - et il ne faisait aucun doute qu'ils parlaient d'she.
"You MUST see this," Renae's boyfriend Josh reportedly texted her. "Like right now."
In the clip, actress Kacey Rohl's character references some of the popular influencers she follows on TikTok , including "everyone's favorite gadget repairman ."
Renae and her friend stayed with them. After all, Renae has made a name for herself in her little corner of TikTok, where she frequently answers questions about common device issues and has more than 649,000 users.
But even if there are doubts as to who the famous TikToker in question really is, something Carlo Mark's character says below ties him up.
"Oh! It's me!" he says to Rohl before asking if he saw "the one in the dishwasher capsules".
It turns out he did, but it's not until later in the clip, when Autumn Reeser's character exits the scene, that we have all the details.
"Hey, what happened to the capsules in the dishwasher?" asks Reeser as he leaves.
"Oh, you don't put that in the detergent," says Rohl, "it ruins everything."
"Yeah, just put it in the utensil basket," adds Marks, before Reeser smiles and says, "Great tip!"
After watching the clip, Renae's jaw is practically on the floor.
"Shit, they're talking about me!" he said on his TikTok. "And they referenced the one piece of information that was wrong and then corrected it."
Renae is obviously excited and a little embarrassed by all of this, considering she was humbly corrected last year after receiving a ton of feedback on her dishwasher pod tip. In fact, in one of his November 2022 videos , he clearly explains why he's been giving this advice for years, using his own personal experience repairing dishwashers.
With that in mind, Renae received a "very important email" from the folks at Cascade after her advice went viral , inviting her to the Procter & Gamble headquarters in Cincinnati, Ohio. There he toured the company's labs and spoke directly to their scientists, who had done some pretty thorough research into why dishwasher capsules should be placed in the designated detergent dispenser rather than the utensil basket.
If you throw the capsule in the utensil basket, apparently 80% of the detergent is used up during the prewash before the main wash can start.
Despite everything, Renae still seems delighted to have received such a mention on TV.
"I know the script for the movie was probably written before I posted my update, but umm... oops," he wrote in his TikTok caption. "THIS IS ALWAYS GREAT! And whoever wrote that in the movie, hi! Thanks very much."
In the comments, her followers did everything they could to make her feel better.
"Congratulations and condolences," one person wrote.
"It's Hollywood," added another. "As long as they talk about you, it's fine."
In The Know is available now on Apple News.Follow us here!
"Hearst Magazines and Yahoo may earn commissions or revenue from certain articles through the links below."
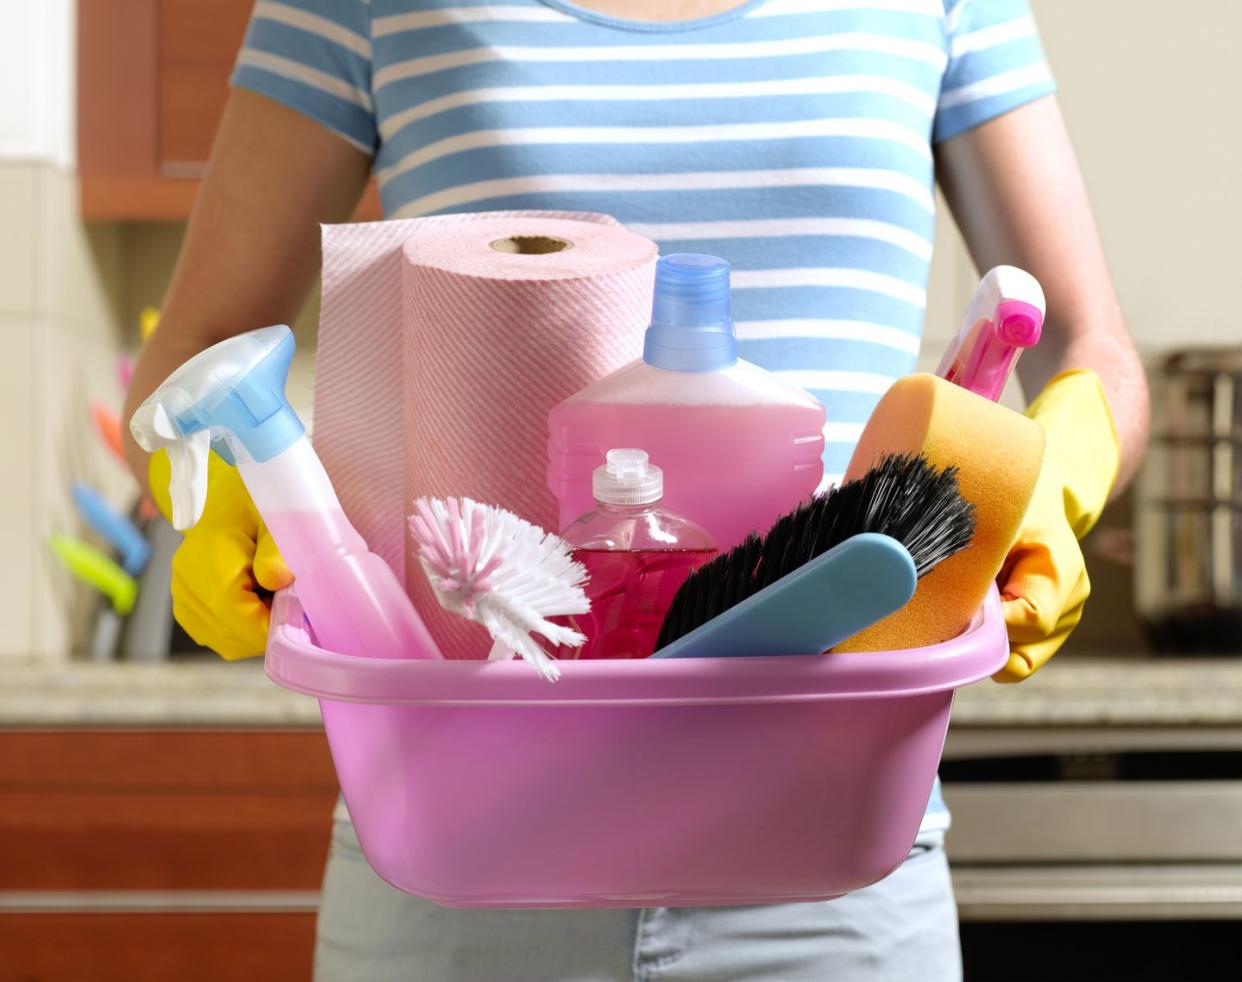
Wondering how to clean smarter ? For starters, there really is no right or wrong way to clean. Cleaning, however you do it, is a great accomplishment in itself that should be celebrated. The fact that you clean is a victory: a clean house can lead to a clearer mind and psyche. Once your home is neat and organized , you'll feel more focused and free to focus on other important tasks. When everything is in place, you can be more productive. The health and wellness benefits of a clean home are also notable. A dust-free home is a home that keeps allergens, germs, and other contaminants out.
Before you dust, clean, and scrub, the first thing to do is "pick up and put away whatever has collected on the floor," says Sharon Lowenheim, MBA, MSE, Certified Professional Organizer and Founder of Organizing Goddess, Inc. "Then that Do the same for all faces" . Kate Pawlowski, founding partner of Done & Done Home , echoed Lowenheim's point of view, adding that cleaning is difficult for some people because they have too many things lying around the house. "We always suggest that a lot of tidying up makes cleaning a lot quicker since everything in your house is tidied up," says Pawlowski.
fake pictures
2. Gather your supplies.
When it comes to cleaning, getting started should be to create a dedicated station for all your cleaning supplies and supplies. Use a bucket or cart to move it around the house while you clean, says Wendy Silberstein, professional organizer and founder of The Aesthetic Organizer . Then "create a master plan and commit to it," she says of Women's Day .
3. Set a schedule.
A cleaning schedule and rhythm can give your home the attention it deserves while keeping your thoughts in check. There's no point in cleaning the same room over and over again if you're neglecting other parts of your home. Break down your cleaning chores into daily, weekly, and monthly lists, suggests Jamie Hord, founder of Horderly Professional Organizing . "You'll never have to spend hours (or days) deep cleaning your entire house again," she adds. Hord recommends cleaning and sanitizing all high-traffic areas daily: doorknobs, counters, kitchens, bathrooms, and laundry rooms , to name a few. "Every week, wash sheets and towels, vacuum and mop floors, dust surfaces and furniture, and clean showers and tubs," she says. As for monthly chores, Hord suggests taking inventory of the groceries in your kitchen , cleaning supplies, and toiletries to make sure they haven't expired or run out.
Once you've cleaned up the mess and gotten your cleaning schedule and cadence, it's time to start cleaning. We spoke to the pros to get their top tips for the best cleaning of your home , so you can get started.
4. Work smarter, not harder.
Professional home cleaner and ConfessionsofaCleaningLady.com blogger Sara San Angelo has a great motto for cleaning: "Work smarter, not harder."
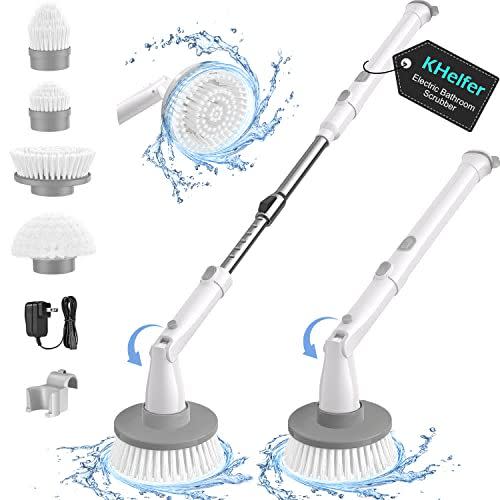
One of the tools that will help you work smarter: a cordless electric rotary scrubber with an extendable arm . "You can clean your entire bathroom with minimal effort," she says. "With the extension arm, you don't have to bend down to clean large bathtubs or showers. Cleaning grout on the floor is very easy. San Angelo even dusts baseboards with a dry scrub head.
Roman Peysakhovich, CEO of national cleaning company Onedesk , recommends cleaning the entire house at every cleaning session, not just one room at a time. "House cleaning is much more efficient when you decide to do a single task like dusting, mopping or vacuuming and do the same task in every room of the house, " he says. "Focusing on one task will save you hours in the long run and avoid having to do the same task over and over again."
The biggest mistake people make is room-to-room cleaning (aka "spot cleaning"). "You can clean your kitchen in four hours or your entire house from head to toe in four," says Lisa Romero, owner of Just Like New Cleaning in Fort Collins, Colorado. "Many people get stuck concentrating on one area, such as deep cleaning countertops, and never reach the stove, let alone the next room. And it goes on quickly and efficiently."
These professionals advocate the chore of cleaning, where a task such as B. Dusting, is done throughout the house before moving on to the next.
6. Dust of size.
Peysakhovich loves the Scrub Daddy Damp Duster for dusting most surfaces in his home. "The knurled edges of this easy-to-use duster catch even the smallest speck of dust," he explains. "This feather duster is built to last and makes dusting your home easy."
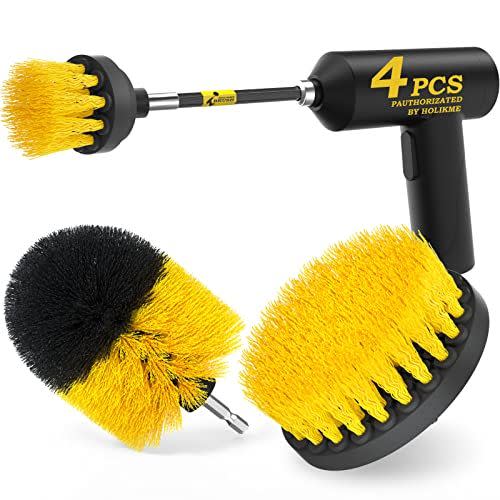
Residential real estate developer and general contractor Bill Samuel has broken new ground in grout cleaning by renovating homes for resale and rental. "When cleaning bathroom and kitchen tiles, we've found that in almost all cases, a simple cleaning solution and a little physical effort is all it takes. However, removing grout stains between tiles is much more difficult." We've discovered an effective way to remove grout from tile," he explains. "First, you need to buy a product that's specifically designed to clean grout, and then check each retailer's reviews to find the right product for the job to find."
But that's where the innovation comes in: Samuel uses a drill brush for the power scrubbing action. Specially use this Holikme Electric Drill Brush Scrubber . Just pop it into your drill and scrub away the dirt.
Doyle James, president of Mr. Rooter Plumbing , a Neighborly business, explains how to maintain your urinal: "For a perfectly clean toilet, mix 1 cup baking soda with 15 drops of tea tree essential oil and 15 drops of lemon or orangeessential oil . Leave the." Leave mixture in bowl for 30 minutes and scrub with bowl brush before rinsing.
9. Clean your dishwasher.
Ron Shimek, President of Mr. Appliance , reminds you to clean your dishwasher regularly. "The dishwasher is one of the biggest culprits for potential mold growth," he says. "Its hot, humid environment is a haven for mold spores, especially if food particles are left behind after the last cycle."
For cleaning, Shimek recommends periodically running a vacuum dry heat cycle to rinse the interior, including the cutlery basket, filter, panels and door seal. "To keep this unit sanitized you can clean the affected areas with diluted bleach and if there is mold in the cutlery basket, soak it in your kitchen sink with diluted bleach and warm water for 30 minutes," she adds. "Be sure to rinse well before putting them back in the dishwasher."
10. Don't forget your drains.
Jake Romano, who works for Ottawa Drain Cleaners , says routine drain cleaning you can do yourself can save you hundreds of dollars in plumbing jobs in the long run. "Every month or two, you just pour 1/2 cup of baking soda down the drain, followed by 1/2 cup of white vinegar," he explains. "Let it bubble and soak for about half an hour before rinsing off with warm water."
Romano says this will remove grease and dirt buildup in drains, which will lead to persistent clogs.
He also suggests using products like enzymatic drain cleaners regularly. "These cleaners are safe for the environment," he adds. "They usually contain enzymes and bacteria that slowly eat away at the buildup of particles in the drains. This can help with your entire plumbing system, even your sewer system.
11. Clean what you clean.
Peysakhovich emphasizes the importance of cleaning what you clean. "To properly clean your home, your cleaning tools need to be clean before you even use them," he says. "You'll end up spending more time trying to clean if you don't clean your tools first."
12. Start at the top and then proceed step by step.
The recommended plan of attack? Top to bottom, left to right. "I always start [in the upstairs bathroom]," says Romero. "It's a good place to drop off supplies." For each task, start at the highest point in the room (dusting can mean high shelves) and move across the room from left to right. This way you won't miss anything and accidentally spill dust on the already cleaned lower shelves.
Step 1: Powder
Dust every room, including the tops of all furniture, the bottoms of shelves, and all handrails, as well as picture frames, TV screens, and knick-knacks. "If it's possible to dry the powder, I'll do it; getting something wet makes it harder," says Romero. To get rid of fingerprints, dampen a microfiber cloth with warm water.
Pro cleaning tip: Look up. "People don't put dust on the furniture, that's where all the dust collects and then falls off," says Romero.
Step 2: Clean the upholstery
Go through the house and undress and remake the beds. Keep pillows or blankets away from furniture. If necessary, brush the furniture surfaces with a vacuum cleaner extension cord.
Step 3: Clean mirror and glass
Easy to forget but important to clean, clean mirrors and windows throughout the home. If possible also outside!
Pro cleaning tip: Using a damp microfiber cloth and a dry cloth will not leave streaks.
Step 4: Disinfect counters and surfaces
Wipe down all surfaces and work surfaces in the house and disinfect them at every step.
Pro cleaning tip: Make sure to clean all the places your fingers touch, like door handles, light switches, TV remotes, and phones. "These are the places that people forget, and they really have germs," Payne says.
Step 5: Spray the bathroom and kitchen
Go around bathrooms and spray cleaners in bathtubs, sinks and toilets. Turn and scrub. Then, in the kitchen, wipe out the inside of the microwave, cabinets, and appliance doors.
Step 6 - Sweep and clean
Sweep, then mop or mop kitchen and bathroom floors and any other floor that needs it. You may want to vacuum first if you have a lot of parts that you don't want to catch in your mop.
Pro cleaning tip: "I always wipe bathroom floors on my hands and knees with a microfiber cloth and a cleaner. That way I know I've reached every corner, including behind the toilets, and they're 100% sanitized," Romero said.
Step 7: Vacuum
"I vacuum the bedrooms, the stairs, the living room and the outside of the house," says Romero.
Pro Cleaning Tip: It's not critical to vacuum every square inch. keep moving You will receive the missed places next week.
Let's face it, cleaning makeup brushes probably isn't high on your to-do list. However, it is an essential task. While we can easily overlook the need, failing to clean your beauty tools regularly will inevitably lead to a buildup of bacteria on your brushes, as well as dead skin cells and more. Ideally, you should clean your brushes at least every two weeks, if not more often.
Hygienic considerations aside, brushes should also be cleaned for optimal performance. For the rest of the above applications, it is difficult to achieve a smooth and even makeup application with a hardened brush. A quality makeup brush cleaner will ensure you remove makeup, bacteria and other contaminants to keep your brushes looking as good as new.
To make sure you don't hesitate any longer, below is our pick of the best makeup brush cleaners out there. But first, read our handy guide on how to choose the best makeup brush cleaner for you.
What qualities should I look for in a good make-up remover?
When choosing a makeup cleanser, consider the following:
The cleaner should be mild. If you use a soap or detergent that is too harsh, it can dry out and even damage the bristles of your makeup brushes.
As an extra step to avoid damage, look for a cleaner that also cares for the bristles. This can help extend the life of your brushes and keep them looking their best for longer.
Make sure the cleaner is suitable for both natural and synthetic brushes. You don't want to damage quality brushes by using a product that wasn't designed for them.
How do you properly clean makeup brushes?
First, rinse the tips of your brushes under lukewarm water. Be careful not to overload your brushes as you will eventually break the glue that connects the bristles to the handle. Then follow the instructions for your specific cleaner.
Some products require you to apply the product directly to the brush, while others require you to apply it with a cloth or towel. Some will see you pour the product into a bowl of water and dip the tip of the brush into it.
After applying the cleanser, rinse the brush or rub it on a textured towel or mat until you can't see it. Once your tools are clean, use a paper towel to soak up any excess water. Dry the brushes flat, preferably on a clean towel, with the bristles hanging over the edge of the surface. Do not pull them up or water will run off the bristles and the glue will come loose (as above).
How often should makeup brushes be cleaned?
For reasons of optimal performance and hygiene, it is essential to clean the brushes regularly. Depending on the type of product you use, you may need to clean your tools daily or every two weeks.
Brushes used to apply powder products generally tend to have less product sticking to them, so you may be able to get away with less frequent cleanings. When it comes to brushes for applying creams and liquid products, however, that's a different story. To prevent the build-up of old makeup, skin cells and bacteria, these brushes should be cleaned daily.
Ask for the most popular makeup brush cleaner and the answer you will hear most often is MAC brush cleaner. This well-known and trusted brand's formula can be used for a quick spot clean or something more thorough.
Apply it directly to the brushes or through a towel that you can use to clean the bristles. The formula cares for the bristles of the brush during cleaning and helps to extend the life of your tools. Luckily, the cleaner dries quickly, so you don't have to wait if your decision to clean your beauty tools was made at the last minute.
As well as providing a thorough cleaning, MAC Cleaner will also disinfect your brushes, meaning you can be confident that your brushes are bacteria-free and unlikely to harm your skin. In short, this brush cleaner is an ideal option to keep your equipment in optimal condition.
Main specifications - Size: 235 ml; Application: Directly with a brush, on a towel; Other properties: Nourishes and disinfects the hair
2. Stylpro Electric Makeup Brush Cleaner – Best makeup brush cleaning kit
For those who want to make the task of cleaning their makeup brushes as easy as possible, why not choose a machine to do the work for you? This electric brush cleaner not only removes excess makeup, dirt and oil, it cleans and dries brushes in just 30 seconds, leaving your tools looking new in no time.
The spinner comes with eight silicone sleeves so it can accommodate any size brush. To use, simply slip the brush into the collar and attach to the press. Put some cleaner in your shatterproof Tritan bowl and dip your brush in it.
The device rotates the brush at a speed of 1800-2200 rpm, which allows you to clean and dry the brush in just a few seconds. Although the kit comes with sample packs of Stylpro cleaner, you can use any brush cleaning solution you like. Cleaning couldn't be faster.
Main Specifications - Size: 20ml; Application: place handle in squeegee, brush in container with brush cleaner; Other features: Including sample cleaner and batteries
3. Sigma SigMagic Brushampoo Foam: The best cleaning shampoo for makeup brushes
Formulated with a short list of ingredients and antimicrobial properties, this foaming cleanser promises to keep your brushes clean and healthy. The main ingredient here is virgin coconut oil, which together with the rest creates a lather that penetrates deep into the bristles and lifts even the most stubborn makeup and dirt.
One of the main benefits of this foaming shampoo is that it helps prevent makeup and dirt build-up on your brushes, which can mean your tools need less cleaning depending on usage. The hypoallergenic formula is fragrance-free and preservative-free, making it suitable for allergy sufferers or sensitive skin.
As mentioned above, the antimicrobial properties not only ensure the elimination of bacteria, but also actively prevent their growth. Cruelty-free, vegan, and sulfate-free, this all-natural formula is safe for everyone.
Main Specifications - Size: 200ml; Application: Apply 1-3 pumps to damp hair; Other Features: Simple ingredients, works with both natural and synthetic brushes.
4. Ecotools Makeup Brush Shampoo: Best vegan makeup brush cleanser
This popular brush cleaner is a great option for those looking for an eco-friendly option. A dermatologist-tested, vegan cleanser that's non-toxic, cruelty-free and 95% biodegradable. It even arrives in recyclable packaging.
Incredibly easy to use, simply wet the bristles of your brush and massage a small amount of shampoo onto it; Rinse the brushes under running water and then dry them completely. You only need a drop of shampoo to clean your brushes, so expect this bottle to last a while.
The formula not only cleans your brushes but also nourishes the bristles of your brushes and keeps them in good condition. Fragrance-free, paraben-free and petroleum-based ingredients, Ecotools Makeup Brush Shampoo is kind to skin, tools and the environment.
Main features - Size: 177 ml; Application: Wet the bristles, put a small amount of shampoo on the brushes; Other properties: Hypoallergenic, paraben-free
5. Boots Makeup Brush Cleaner Mat - The best makeup brush cleanser mat
Even if it may seem superfluous at first glance, once you have tried a brush cleaning mat, you will no longer want to be without it. This silicone mat offers a textured surface to clean your brushes on at a very low price, providing that much-needed extra help.
Attach the mat to the sink with the suction cup to use; This will ensure it stays in place when you brush over it. Once in position, wet your brush and add cleaner as usual. Once the cleaner has lathered up, gently rub the bristles in a circular motion down the length of the carpet. Keep doing this until you see no sign of makeup and you have a clear stream of water after rinsing.
There are different textures around the mat designed for specific types of brushes. Hearts work best with large brushes, straight and wavy lines work best with foundation brushes, and the dotted section works best with smaller brushes.
Main Specifications - Size: measurements not given; Use: Attach to sink, apply cleaner to wet brush, rub across carpet in circular motions; Other features: deep grooves, multiple patterns for different brushes
The first and most important step in preparing for spring cleaning is tidying up , because the less stuff you have, the easier it will be to clean your space. Although many of us hoard things we don't need, we tend to approach spring with a little more clutter because most people hoard things during the holidays. "When we cleanse the physical realm, it can inspire us to remove what no longer serves us, like unhealthy relationships or our relationship with food, technology, or other substances," Wolanin says of Healthline.
Additionally, a study published in the Journal of Environmental Psychology found that clutter in the home can negatively impact our overall well-being and happiness. "When there's a lot of clutter, you lose control of your physical environment, which is very discouraging and can lead to stress, depression, or anxiety," says study co-author Catherine Roster, Ph.D. (via Everyday Health ).
Spring is a time associated with renewal and rebirth, and the perfect time to declutter your closet, garage, trash drawers, and any other living space where things accumulate. It can help you start the new season with a clean home and also reminds you of the importance of letting go of what no longer serves you.
When it comes to running a successful restaurant, cleanliness is key. A clean restaurant makes customers feel more comfortable and is a sign of a restaurant that prides itself on its food and service.
Unfortunately, keeping a restaurant clean is not an easy task. It requires daily effort, attention to detail, and the right tools and materials. The good news is that with the right knowledge and tools, it is possible to keep your restaurant clean and safe for your customers.
In this article, we discuss the importance of cleanliness in restaurants and give you the best tips and tools to keep your restaurant clean.
The end of January is approaching, which means spring is just around the corner. There's a lot to celebrate: sunny skies, warmer weather and of course the return of BBQ. Before you prepare your first cookout of the season, you need to know how to properly clean your gas grill after the winter.
Whether you store your grill in the garage or under a weatherproof cover, it requires a thorough cleaning. Even if it isn't dusty or spider infested and you cleaned it the last time you used it, your gas grill has been sitting for a long time and as a result dirt, grease and bacteria have accumulated on its surfaces. . . Before you start cooking, you need to clean them thoroughly. But where to start and what to clean with?
To help you restore your grill to its former glory and make it the best gas grill you've ever seen, we asked the experts for their tips on making your gas grill spotless again after a cold winter. Here's what you need to know.
Jacob Mueller
Jakob is a retired medic who became a pit master in his heyday. He and his wife founded Barbecue Pals, an online blog where they share informative grilling tips, delicious recipes, and a humorous take on the world of grilling.
Why clean a grill after winter?
(Image credit: Weber)
While it's perfectly safe to use a gas grill in the winter , I can almost guarantee it's not. After being out of service for the past three months (probably even longer), your gas grill is inevitably in need of a serious upgrade. After all, you're not cooking your dinner on a counter that hasn't been wiped down in three months.
"Cleaning a gas grill after the winter is over is an essential step in making sure it's ready for grilling season," says Jakob Miller, grill master and founder of the Barbecue Pals blog (opens in a new tab) . "It's important to remove accumulated grease and debris that may have built up over the winter months."
Because your grill is primarily metal, it also needs the right care and attention to prevent it from rusting or tarnishing in the future. "Like anything else, your grill deserves a little maintenance from time to time, and using the right products can extend the life of your grill and keep it looking new year-round," says Dan Cooper, Head Grill Master at Weber( opens in a new tab) .
What are the risks of not cleaning your grill?
I'm all for making the spur of the moment decision to fire up your grill at the first sign of heat, but I also know that you definitely don't want to give it a deep clean, especially when you're having guests over. . You might be tempted to skip cleaning altogether and maybe wipe down with a soapy cloth if you have the time, but there are actually real risks of not properly cleaning your grill after the winter.
Ignoring your first seasonal cleaning can not only cause damage like rust and corrosion over time, but also pose a more serious health hazard. "If you don't clean your gas grill after a long time, grease and dirt can build up, which can lead to flare-ups and uneven grilling," says Jakob. To ensure your food is well cooked and to avoid any risk of fire, it is important to clean your outdoor grill before grilling.
What is the best way to clean a winterized grill?
(Image credit: Napoleon)
With that out of the way, it's time to tackle the question of how to actually clean a grill . This is no ordinary job with a damp cloth and antibacterial spray - you need the right tools and cleaning products if you want to do it all.
Before you begin, Dan encourages you to disconnect your gas cylinder and before anything else, refer to your owner's manual for instructions for your specific model. It then offers an easy 4-step method to clean your device.
Step 1: Burn
This first step is important to make this job as easy and hassle-free as possible. According to Dan, you should start by heating your grill to maximum temperature for about 30 minutes. "Be careful, the dirtier the grill grates are, the more they smoke," he says. "Once the grill has stopped smoking it has usually burned off most of the old grease and residual grease, then turn it off."
Step 2 - Clean the grille
While your grill is still hot, brush the grill grates with a stainless steel bristle grill brush. As Dan points out, "This will remove any residue or debris left over from incineration." Be sure to wear protective gloves as the grates are hot and the bristles are sharp.
(Image credit: Weber)
Step 3: Disassemble
Once your grill has completely cooled, you can safely remove all grates and internal components and clean everything with a brush and scraper. "The initial burn should have loosened any carbon buildup from the cookbox, which ensures that all of the grease channels are clean," says Dan. At this point you should probably switch to a pair of rubber gloves as things can get pretty messy.
If your grill has a grease trap, now is the time to remove it and clean it in your sink with hot, soapy water. Do not be tempted to hose down parts or put them in the dishwasher as this may cause some parts to rust. "When you're done, put all the clean pieces back on the racks," Dan explains. "Oiling grill grates very lightly with a grill grate oil like sunflower oil can help prolong their longevity."
Step 4 - Clean the exterior
Finally, you can turn your attention to the exterior parts of your grill. Dan suggests using an enamel and stainless steel cleaner for a shiny grill. "For the best shine, I use a microfiber polishing cloth," he says. Don't forget to check the petrol tank and the valves and replace them if necessary, then you're good to go.
The three best grill cleaners
(opens in a new tab)
GrillArt grill brush and scraper, Amazon..
Save money with this two-in-one grill brush and scraper from GrillArt, available on Amazon. This multifunctional tool is your ultimate weapon against dirty grills, bad tasting meat and unhealthy grilling. It also makes your cleaning job twice as fast!
(opens in a new tab)
Heat Resistant BBQ Gloves from Amazon
These heat resistant gloves do double duty in cooking and cleaning. After you've seared your grill, it's important to wear protective gloves to avoid burns when scraping residue, and these textured, non-slip gloves are just the ticket. They even withstand temperatures up to 932°F!
(opens in a new tab)
Microfiber towels, Amazon
Adding something to your shopping list is annoying, but important nonetheless. These ultra-soft, non-abrasive microfiber cleaning towels from Amazon prevent scratches on your grill and absorb greasy messes. Use a wet one for cleaning and a dry one for cleaning and polishing. You won't go short with this 24-pack.
In theory, cleaning a mirror shouldn't be difficult. A few sprays of cleaner followed by a thorough cleaning appears to leave a streak-free, shiny, reflective surface. But all too often this is not the case.
If this sounds familiar, you're probably cleaning your mirror improperly. Here are some common mistakes to avoid.
Avoid these mistakes when cleaning a mirror
While the focus is on using the right product to clean a mirror, many of the most common mistakes are related to the technique and what is used to clean it. Here are some examples of these errors:
Use of paper towels
As useful as they are, when you use paper towels to clean your mirror, they usually leave behind a kind of lint that keeps it dirty. Instead, use a clean, streak-free, lint-free microfiber cloth.
Don't dust off first
Dust deposits are part of what makes the mirror dirty. And if you throw away the cleaner right away without dusting it first, the dust will get wet and then spread all over the mirror. The process will be easier if you first wipe the mirror with a clean, damp microfiber cloth to remove dust.
Use a dirty cloth or sponge
Always wipe your mirror with a clean, fresh cloth. The one you used to clean the rest of the room is dirty and will make your mirror worse.
Spray cleaner on the mirror
Doing everything right, but still have a scratched mirror? Some people find that spraying the cleaner onto their cloth instead of directly onto the mirror helps.
When you spray your mirror, it's easy to overdo it and use way more cleaner than you really need. If that happens, you could end up sinking and eventually scratching yourself. Spraying the fabric instead of the mirror prevents this.
Washing machines clean dirty laundry , but they also need to be cleaned themselves. According to Currys, there are several "tips and tricks" you can use to make your device last longer. Advice included leaving the machine door open and cleaning the machine.
1. Leave the door open
Currys experts recommend leaving the washing machine door open after each use to allow it to dry.
Closing the door causes mold to form in the drum, which can leave a musty smell on clothes and is often difficult to remove.
2. Have the empty machine hot wash once a month
Modern laundry detergents are excellent for washing clothes at low temperatures, which means that most Brits opt for a low temperature because it is more economical to use.
However, this allows dirt to build up in the machine that would have been washed had a hotter wash been used.
Regular cleaning of the door seals is essential to reduce mold that may have accumulated in the wet area of the machine.
According to Currys, mold that rots will eventually become embedded in the rubber, making it almost impossible to remove.
The experts said: "The large piece of rubber between the drum and the door can be a great hiding place for mold.
"Gently remove the rubber tabs so you can clean your washing machine door seal." Take some white vinegar, bleach or just a damp cloth and wipe the entire joint.
According to experts, cleaning your device regularly can also help it last longer and produce cleaner clothes.
There are a number of ways to keep your machine clean, whether you use natural products or specialty products bought from supermarkets or other retailers.
Currys explained: "A lot of washing machines have self-cleaning programs, so it's best to always leave them running before trying anything else.
"If you don't have a self-cleaning cycle, you can do it yourself with special cleaning products. For a homemade option, you can try cleaning your washing machine with vinegar.
"Just pour two cups of distilled vinegar into your laundry tub. You can also use baking soda or baking soda to clean your washing machine.
"Spray half a cup into your drum and then let your washing machine heat up, it's easy."
Brits should also clean out their detergent drawers regularly, especially when there is an excessive build-up of detergent or fabric softener.
Another area to focus on is the filter, which catches the loose bits that come out during washing. Simply remove the filter, which is often located at the bottom of the machine, and run it under hot water.
First of all, not all microwaves are created equal, some are higher quality and will likely last longer than their cheaper counterparts. However, according to Consumer Reports , this device should last around nine years on average. One of the main factors that determines the lifespan of your microwave is how often you use it. A device that is subjected to an unusual workload is more likely to fail sooner than a device that is used a few times a week.
A microwave is powered by a device called a magnetron, which Viva Flavor says technically shuts itself off after 1,500 to 2,000 hours of use. That means your device will last just over six years if you use your microwave for about an hour a day. Aside from that, the lifespan of your microwave can be further shortened if you don't properly maintain the unit or put the wrong items in the microwave.